Running with Chisels Vol. 19
Marquetry tips
Browse by Category:
Welcome
Our corner of the internet dedicated to decorated furniture
#saynotonakedfurniture
#dressyourfurniture
rwc archive
tools
classes
Vol 19 | February 21, 2025
In this issue Dave covers the newest marquetry class (Geometric Marquetry II,) chatoyance as a design decision, understanding how glue works, and how to flatten a warped panel.
Greetings, fellow marquetarians. I hope that you are all making things in our dreary winter conditions.
Geometric Marquetry II is ready to roll
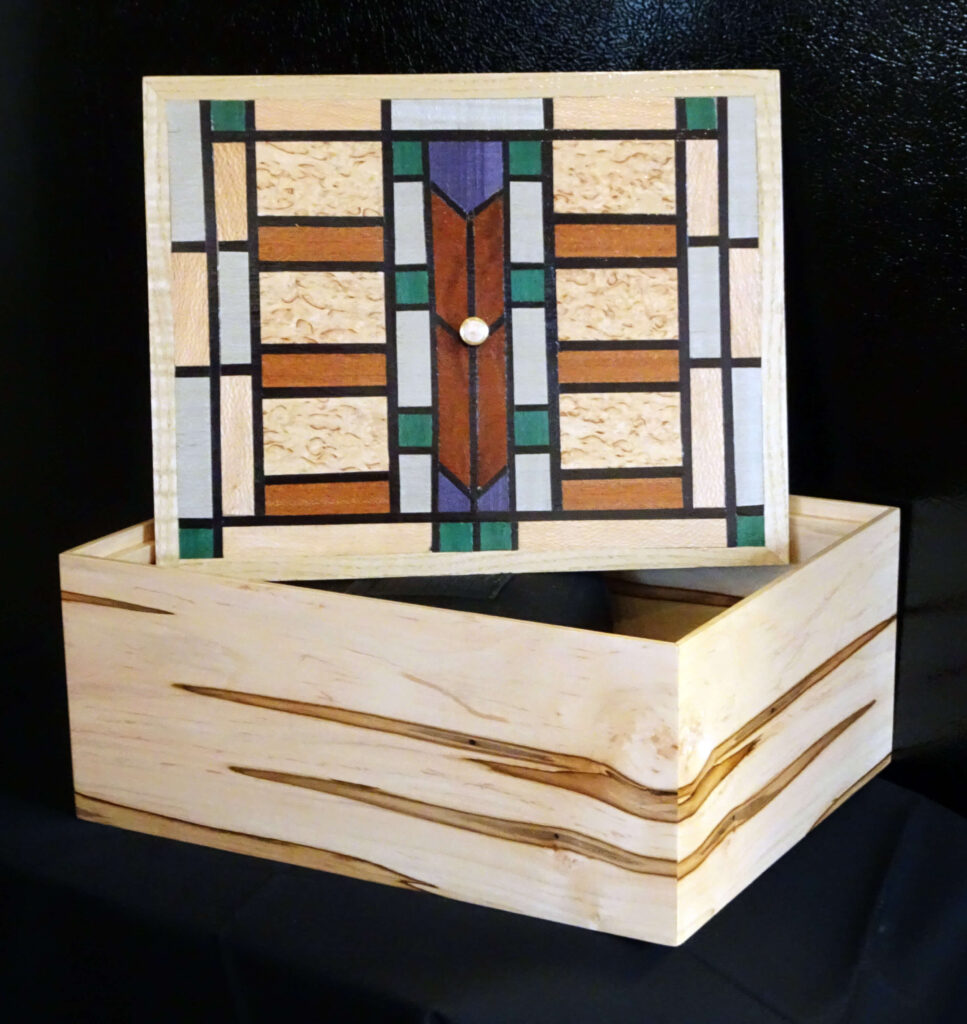
In Geometric Marquetry I we learn how to make pleasing linear patterns. Eyeballs are excellent at seeing slight deviations in straight lines, even when they are not continuous, so the techniques are focused on alignment and balance. We practice these techniques by making a prairie-style stained glass window in veneer, learning to cut veneer precisely and in balance. We use that pattern as the lid on a box. Once these techniques are understood many stained glass and quilting patterns can be made using veneer to decorate furniture or boxes.
The obvious extension to this technique is to add curves. It has taken me some time to develop a class where we can cover the critical issues in two days, and make a cool picture at the same time. Drum roll…….
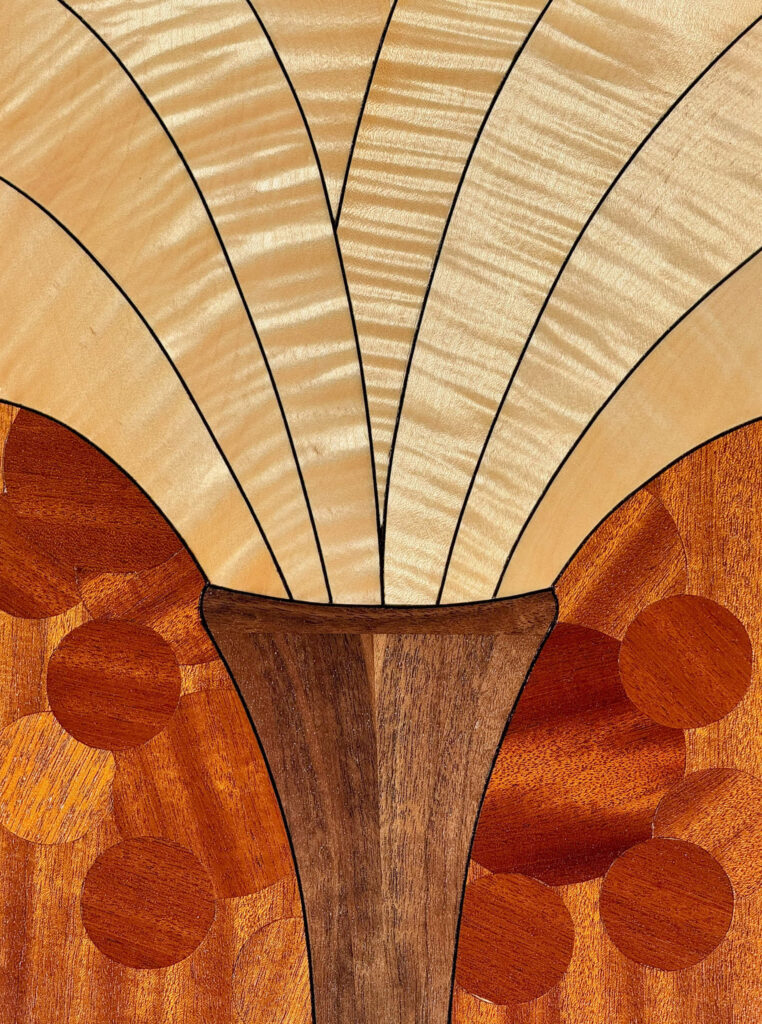
This picture is based on Art Deco images, and I think of it as a fountain. Many Art Deco patterns have similar intensely geometric combinations of straight and curved lines.
There are three main learnings in the class:
We make circular and French-curve shaped templates in the class, using mdf. The key is to draw the final version of the picture after the templates are made from the initial plan, so that the shapes match exactly. Once we’ve got our picture we will cut the veneer, fit it, and glue it up, all on Day 1.
On Day 2 we will install the black lines into the picture. The lines are veneer turned on edge, which means that they are a constant width. Cutting the troughs is all technique, then we lay the lines in. One set has a wicked little curve, so we will use a soldering iron to convince the veneer not to break.
The inaugural class is March 29-30, and it is now full. I look forward to reporting back after the class.
New Class Location(s)!
I’m pleased to announce that I will be teaching at the Ted Harlan Woodworking School in Louisville KY in August. The classes will be :
Fri, Aug 22-Sat Aug 23 Teaching Painting with Wood – Pictorial Marquetry
Sun, Aug 24 – Tues, Aug 26 Teaching Double Bevel Marquetry Intro
Details will be listed on their website soon.
I am also talking with Michael at the Woodshop Squared in Sacramento CA. We are working on timing and costs and which classes would be offered. If you would like to take a class from me in beautiful Sacramento reach out to them here and let them know which class you’d like to take. We are both hopeful that we can figure something out but it would be easier for Michael if he knew he had some students lined up.
In this edition of Running with Chisels:
- Veneering Lexicon: What is Chatoyance?
- Tech(nique) Topic: Why understanding how your glue works is important
- Tech(nique) Topic: Flattening a warped veneered panel
Veneering Lexicon: What is Chatoyance?
Chatoyance is the flash of light or dark that some woods exhibit when the direction of the light or viewing angle changes, giving it a 3-D effect. The word comes from a French root, that refers to a “cat’s-eye” phenomena.
In solid wood furniture, this is mostly a feature that the maker tries to minimize by getting the wood orientation as consistent as possible across the piece. This reduces the likelihood that walking around the piece will result in one section suddenly looking highlighted.
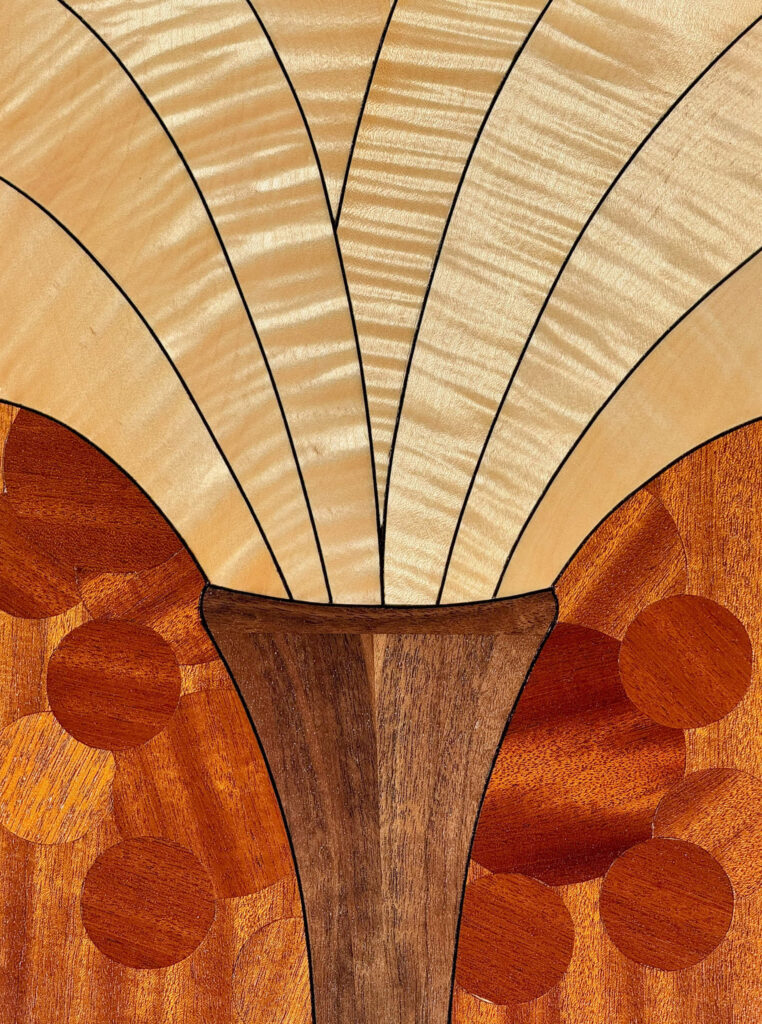
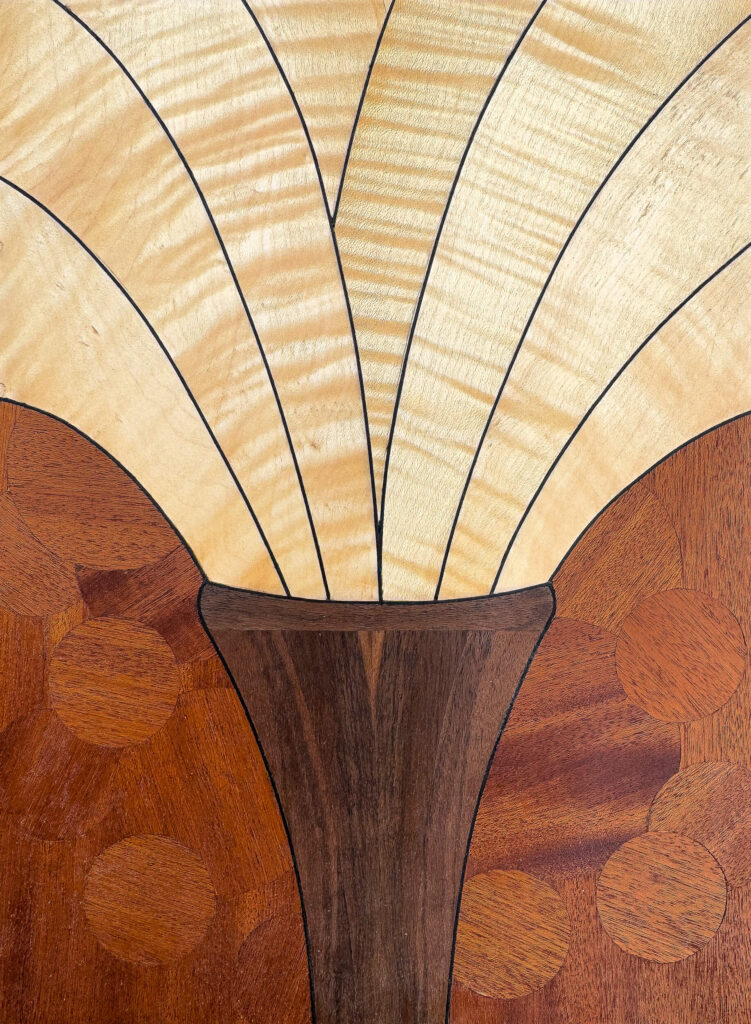
With veneer, grain direction is at the discretion of the artist, so rotating some pieces vs others to generate that light flash is a design option for some woods. Chatoyance depends on the growth patterns of the cellular structure of the wood, and the cells essentially act as mirrors reflecting the light at certain angles only. These growth patterns, specific to a tree type, give each wood its own specific chatoyance characteristic as part of its figure and grain. All “curly” woods are chatoyant, and the curl goes positive and negative depending on viewing angle. Honduras mahogany has high chatoyance, as does curly maple.
The mahogany circles in the background of the Art Deco piece above are highlighted or muted because of chatoyance – they appear and disappear depending on your viewing angle. These are two pictures of the same object, but with the sun at a different angle. It is muted, but the lit-up circles are different. The effect is much more pronounced in strong daylight.
Considering the effect of chatoyance on a piece is an important aspect of marquetry. A wood that adds desirable contrast or liveliness in a pictoral work can be a distraction that ruins the effect of symmetry in bookmatched panels, for example.
Taking this into account as you are selecting and orienting veneers is especially important in Veneering for Furniture Makers – we still have openings for this class on March 1!
Tech(nique) Topic: Why understanding how your glue works is important
Glue Misbehaving? Knowing how your glue works helps when you need to fix something.
I know that all of your glue-ups are flawless, but some of mine are less so. Here are some of things I use to resolve less than perfect glue-ups.
Titebond 3
I prefer to use Old Brown Glue (OBG) for my marquetry pictures, but I will use Titebond 3 on occasion. OBG takes about a day to dry. The Titebond cures faster, so I often use it for classes, or when I’m in a hurry. There was a wrinkle in a student panel last weekend, which we noticed on the second morning – it had gone in the press late on the first day.
Heat is the tool to fix partially cured Titebond – for this reason I have an iron with optional steam in the shop. Set the heat to medium. When hot, heat around the wrinkle/bubble until it is just touchable, so maybe 130-140 deg. This is enough to reactivate the glue. Immediately clamp it – I use a ¼” acrylic sheet so that I can see exactly where I need to place it. Clamp it firmly until the panel is completely cool, maybe an hour. Fixed. This will work with Titebond for maybe a week, though it works better the closer it is to the initial glueup.
Titebond (or any PVA) works through a chemical reaction, where active sites on the vinyl acetate molecules react with the wood, and each other in the presence of oxygen to form binding molecules. Those reactive sites are mostly consumed in the first couple of hours, but it takes several days in cool conditions to fully cure. Heating the veneer reenergizes the unreacted sites, then firm clamping gives those sites another chance to bind the way we want them to. If this doesn’t work, I would try steaming it, but I’m not at all sure it would help.
Old Brown Glue
The thin black lines that I like to highlight my hummingbirds with are prone to misbehaving. I had two bad actors this week, both glued with OBG. The black veneer must be ever so slightly thinner than some of the other veneers, and it is so narrow that the bag can’t get good pressure. There was a small lump/instability in the birds when I ran my fingers across them, (which is good practice before leveling the picture out.) Hide glues, including OBG, do not undergo a chemical reaction. They are sticky long chain organic molecules that, when wet, can move. The water is the transportation system, and the glue sticky sites are activated by the water, but the reaction is reversible, which is why you can wet old hide glue and it will act like glue again.
Since I had used OBG, I can reactivate it indefinitely if something gets loose. In the case of my hummingbird black lines, I heated the glue with the iron the same way as the Titebond, and clamped it firmly, and fixed the issue. The primary difference is that I can fix OBG three months or three years after the glue-up, but only a couple of days after for the Titebond. Plus, it behaves better under finishes, but that is another discussion.
If you steam hide glue using an iron, you are adding extra energy and lubrication to the glue. So long as you are precise with it, this can be beneficial, but too much water or spread too wide can loosen whole sections of a panel, and everything will move. It is exciting, not what I’m looking for when doing a repair. So, I do use steam, but judiciously, and primarily when I want to remove a well-adhered piece of veneer.
Tech(nique) Topic: Flattening a warped veneered panel
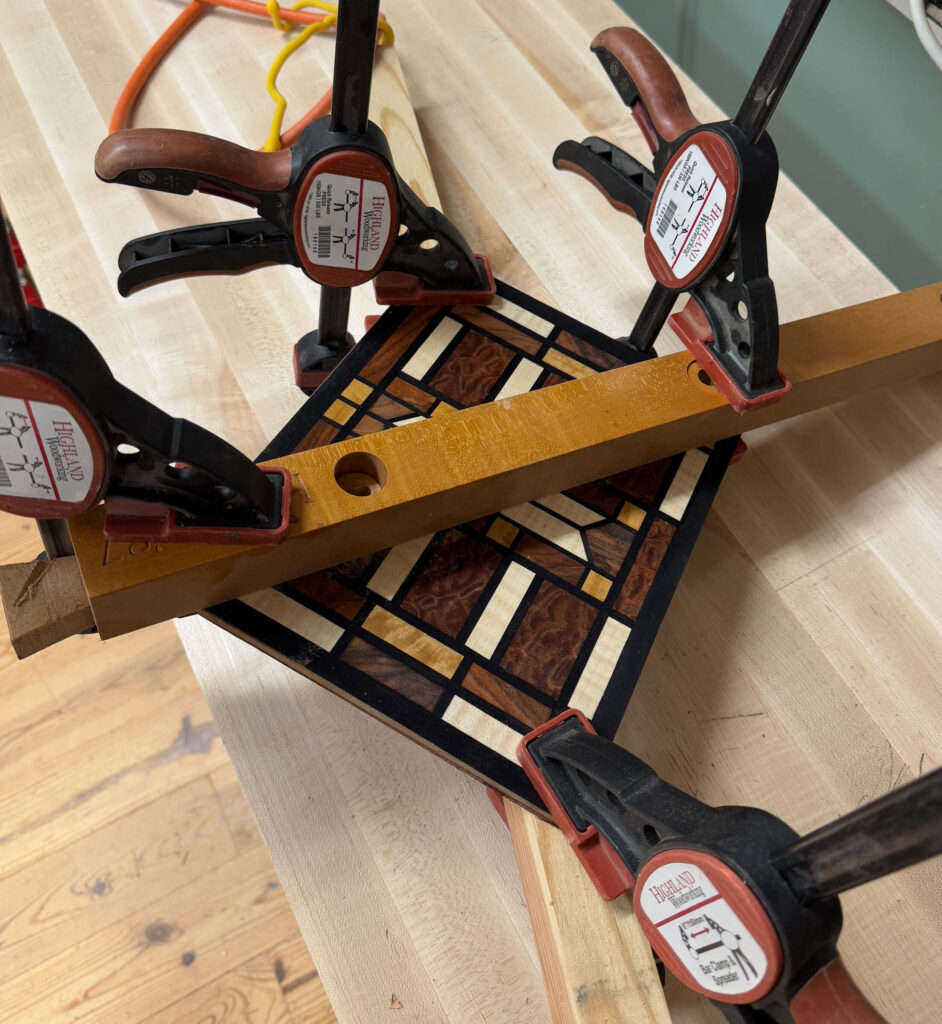
A “joy” of water-based glues is the stress they add to the substrate. The water causes the veneer and the substrate to swell. The glue then dries which locks any shape in place, then the water evaporates. I always glue a backer to the reverse side of the panel at the same time so that both sides are evenly stressed, and most of the time, if you allow the panel to dry with good air access on both sides, it will dry flat.
Sometimes they don’t, and sometimes I might store a panel so that it wasn’t well supported and it had better air circulation on one side. I think that is what happened to the panel above. It definitely wasn’t flat, which makes sanding chancy. You can see my solution: I wet both sides with water, and then clamp thick boards across the diagonals of the panel, one on each side. The next day – flat.
It works about 90% of the time if the curve is moderate.
If you have a method that works for you I’d love to hear about it, because this doesn’t always work. The best approach is to get it to dry flat in the first place, and then store it sensibly- either air on both sides, or stacked so air on either side.
return to the running with chisels archive
return to top
©️ 2025 Heller & Heller Furniture | Privacy Policy | Terms